
Alcohol markers can get expensive fast.
You buy a set because the colors look good, the swatches seem rich, and the review sounds convincing. Then after a few weeks, the brush tip on your favorite shade starts to split. One cap stops closing properly. A blender dries out before you have used it much.
That is the problem with buying markers based only on color count or packaging.
A good alcohol marker should blend smoothly, keep a clean tip, seal properly, and work well on the paper you actually use. If you draw often, refillable ink and replaceable nibs also matter because they can save money over time.
For this guide, we looked at how different alcohol markers perform during real use. We focused on tip wear, ink flow, blending, cap seal, paper performance, and long-term value.
The goal is to help you choose markers that fit your drawing style, not just the set with the biggest number on the box.
Key Takeaways
- Budget alcohol markers can be a smart starting point, but some brush tips wear faster under heavy use.
- Refillable markers cost more at first, but they can be better value for artists who draw often.
- Paper surface matters more than paper weight alone. Smooth marker paper usually gives better blends and less tip drag.
- Ohuhu Honolulu is a strong budget pick, but some artists may still need extra skin tone or gray tone packs.
- Copic Sketch remains the pro-choice because it has refillable ink, replaceable nibs, and a 358-color system.
- Replace a damaged nib early. A split or soft tip can make you press harder, waste ink, and rough up the paper.
Table of Contents
What Most Artists Get Wrong About Alcohol Markers
Most artists start by asking, “How many colors do I get?”
That is not the best question.
A large set can still be frustrating if the colors overlap too much, the caps feel loose, or the brush tips lose their shape quickly. Once a tip goes soft, clean lines become harder. You press more, use more ink, and get rougher results.
The better question is:
How long will these markers stay useful?
For casual coloring, a budget set may be enough. For portraits, comics, client work, daily sketching, or serious practice, build quality matters more. That is where refills, replacement nibs, cap seal, and tip control become important.
Quick Picks
- Best Overall: Copic Sketch
- Best Budget: Ohuhu Honolulu
- Best for Crafts: Spectrum Noir Illustrator
- Best for Loose Color: Winsor & Newton Promarker Brush
- Best for Beginners: Caliart or Ohuhu
How We Tested the Markers
We tested each marker line over 30 days of regular drawing. Each marker was used for 60 to 90 minutes a day, five or six days a week. We used them for portraits, comic-style panels, lettering, blending, and larger filled areas.
We checked five main things:
- How quickly the brush tip softened, split, or lost control
- How evenly the ink flowed during blending
- How well the caps sealed after repeated use
- How fast the marker used ink during normal drawing
- How the same marker performed on different paper surfaces
It matters because many markers feel good on day one. The real test is if they still feel good after weeks of use.
Paper Surfaces Used in Testing
Paper tooth eats nibs. It also changes how ink sits and blends. We tested every marker on different surfaces, chosen because they represent the range most artists actually use.
Copic XL Marker Paper is the industry standard for alcohol markers. It’s ultra-smooth, practically bleed-proof, and lets the brush glide. The surface gave us a baseline for blending scores and nib wear under ideal conditions.
Bristol board, both smooth and vellum, is the go-to for illustrators who ink and color on the same sheet. The smooth side mimics a finished comic page. The vellum side has just enough tooth to grab pigment differently, which accelerates tip fraying and reveals how a nib holds up under friction.
Hammermill Premium Cardstock is the budget workhorse. It’s heavier than copy paper but far cheaper than marker pads, so crafters and hobbyists rely on it. The surface is slightly absorbent, which stresses ink delivery and exposes dead caps faster. If a marker can survive 30 days on Hammermill, it’s built tough.
With the methodology clear, the comparison table below gives you an at-a-glance overview of all seven lines.
Comparative Specifications
Here is how the seven marker lines compare on the specs that matter most when you are budgeting.
| Brand / Line | Tip Configuration | Total Colors | Refillable | Replaceable Nibs | Approx. Price Per Marker | Best Use Case |
|---|---|---|---|---|---|---|
| Copic Sketch Markers | Super Brush + Medium Broad | 358 | Yes | Yes | ~$5.24 | Professional illustration and heavy daily use |
| Ohuhu Honolulu Brush Tip Markers | Brush + Chisel, or Brush + Fine depending on set | 320 in largest set, 345 individual Honolulu colors | Limited refill support | Yes, replacement brush nibs available | ~$0.77 to $2.49 | Budget artists who want strong brush performance and a wide color range |
| Winsor & Newton Promarker Brush | Brush + Broad Chisel | 72 | No | No | ~$3.75 | Rich color work, fashion sketching, and expressive illustration |
| Arteza EverBlend Art Markers | Brush + Chisel | Commonly sold in 72 to 120-color sets | No | No | ~$1.50 | Hobby artists, coloring books, and craft projects |
| Spectrum Noir Illustrator Markers | Brush + Fine | Up to 216 across the wider Spectrum Noir alcohol marker system | Yes, where re-inkers are available | Yes | ~$2.75 | Crafters and illustrators who want mid-price markers with replaceable nibs |
| Caliart Dual Tip Brush Markers | Brush + Chisel | Commonly sold in 100 to 168-color sets | No | No | ~$0.50 | Beginners and casual coloring |
| TouchNew Brush Markers | Brush + Chisel | Commonly sold in 80 to 168-color sets | No | No | ~$0.70 | Students, anime practice, and entry-level marker work |
Prices are approximate and can change by retailer, set size, sale, and region. Always check current pricing before buying.
Brush Tip vs. Standard Tip: What Brush Really Means
Not every marker labeled “brush” feels like a real brush.
A good brush tip bends under pressure and returns to a fine point when you lift it. That spring-back helps you make thin lines, thicker strokes, soft curves, and smooth shading with one tip.
A stiff felt tip is different. It may look pointed, but it does not flex the same way. It can work for filling spaces and basic coloring, but it is harder to control for line variation.
Brush tips are best for artists who need flexible line control. They are useful for portraits, manga, comics, character art, fashion sketches, brush lettering, soft shading, and blends.
For these styles, the tip needs to move from thin to thick without breaking the stroke.
But not every artist needs a brush tip. If you mainly work with straight lines, simple crafts, block coloring, or tight coloring book spaces, a fine tip or chisel tip may be easier to control.

Best Alcohol Markers to Consider
1. Copic Sketch Markers

Copic Sketch is the safest pick for serious artists who want a marker system they can keep using for years.
The brush tip is the main reason. It holds its point well, gives smooth pressure control, and does not go soft quickly under regular use. The chisel tip is useful too, especially for backgrounds, flat fills, and larger shaded areas.
The biggest strength is the refill and nib system. Copic Sketch markers can be refilled, and the nibs can be replaced when they wear out. A Copic Ink bottle can refill an empty Sketch marker up to 7 times, so the long-term cost becomes easier to justify if you draw often.
The 358-color range is also hard to beat. The color codes make it easier to build blending groups, choose light and dark shades, and replace single colors without guessing.
Copic Sketch is not cheap, and beginners may not need this level of investment right away. But for portraits, comics, illustration, and daily drawing, it is still the most complete option here.
- Refillable ink
- Replaceable nibs
- Strong brush tip control
- Huge 358-color range
- Easy color-coding system
- Best long-term option for heavy use
- High upfront price
- Refills and nibs add extra cost
- Not the best choice for casual users
Best for: Serious artists, illustrators, comic artists, portrait artists, and anyone who uses alcohol markers often.
2. Ohuhu Honolulu Brush Tip Markers
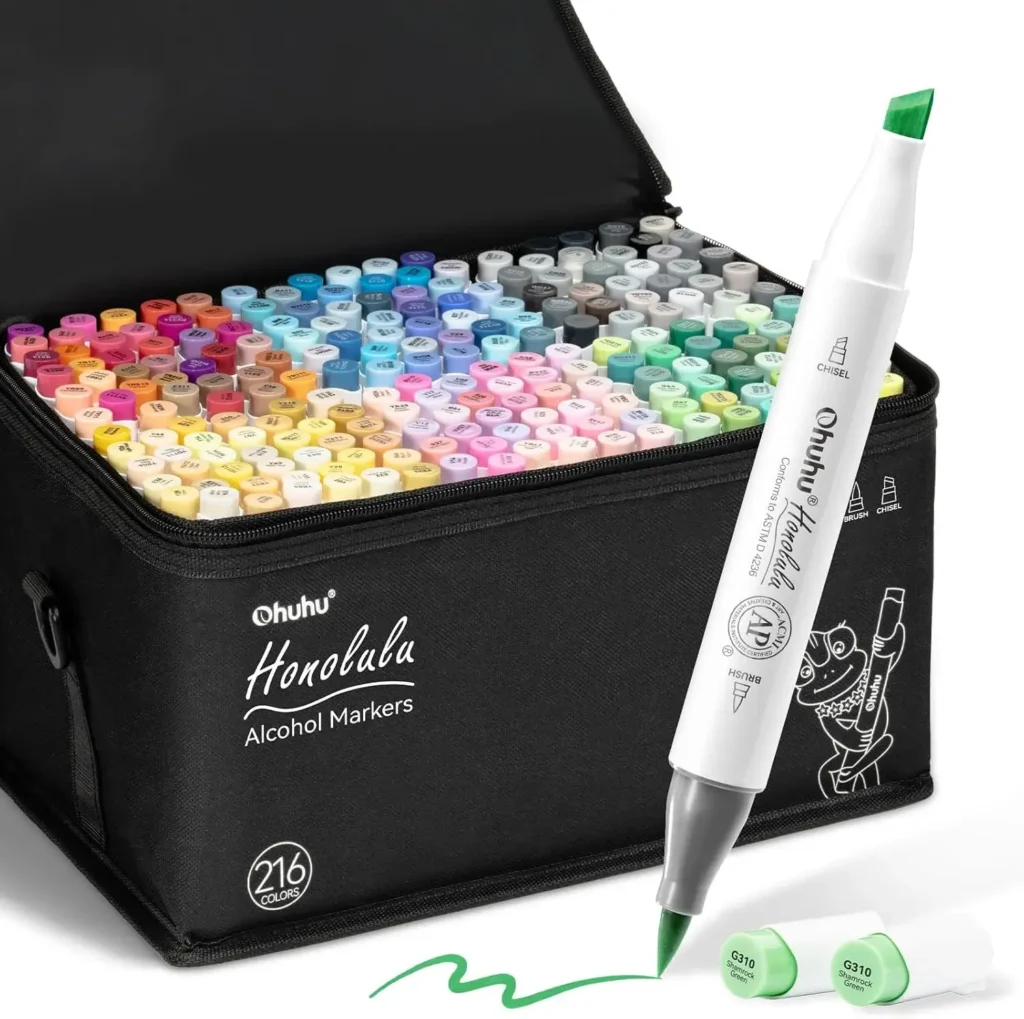
Ohuhu Honolulu is the best budget-friendly option for most beginners.
The brush tip feels good for the price, the colors are bright, and the sets give you plenty of room to practice blending, shading, and basic illustration. The caps feel secure, and the markers are easy to use straight out of the case.
The main trade-off is long-term wear. The brush tip can lose its sharp point faster than Copic, especially if you press hard or use rough paper. The ink system is also not as strong for long-term professional use, even though Ohuhu now offers individual markers and more support than many budget brands.
Ohuhu is a smart starting point if you want alcohol markers without spending Copic money. Just do not expect the same tip life or refill system.
- Great value for beginners
- Good brush feel for the price
- Large color sets available
- Skin tone and gray tone sets available
- Easy to start with
- Brush tips can wear faster with heavy use
- Not as strong for long-term daily work
- Color organization can be confusing across old and new codes
- Some sets may still need extra skin tones or grays
Best for: Beginners, students, hobby artists, coloring books, practice work, and artists who want a large color range on a budget.
3. Winsor & Newton Brush Markers
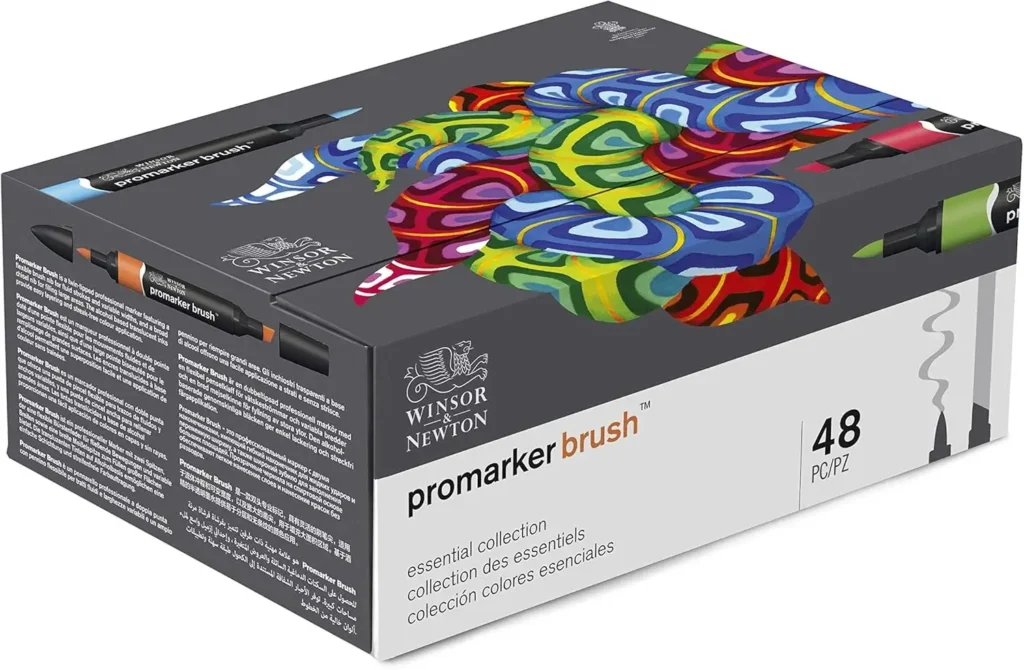
Winsor & Newton Brush Markers are best for artists who like rich color and loose, expressive strokes.
The ink lays down strongly, so one pass can look full and smooth. The brush tip works well for sweeping lines, fashion sketches, soft shading, and artwork where you want a fluid hand-drawn feel.
The downside is control. These markers can bleed more on absorbent paper, and the tip may feel too soft if you need tight detail. They are better on proper marker paper or smooth surfaces where the ink does not spread too quickly.
They are not the most practical daily marker for every artist, but they can be lovely for bold, loose work when you know how to control the ink.
- Rich ink laydown
- Good for loose strokes
- Nice for fashion sketches and expressive art
- Smooth color coverage
- Can bleed on the wrong paper
- Less ideal for tight detail
- Uses ink quickly on absorbent paper
- Not the best value for heavy daily use
Best for: Fashion sketching, loose illustration, expressive lines, and artists who like rich alcohol ink color.
4. Arteza EverBlend Art Markers
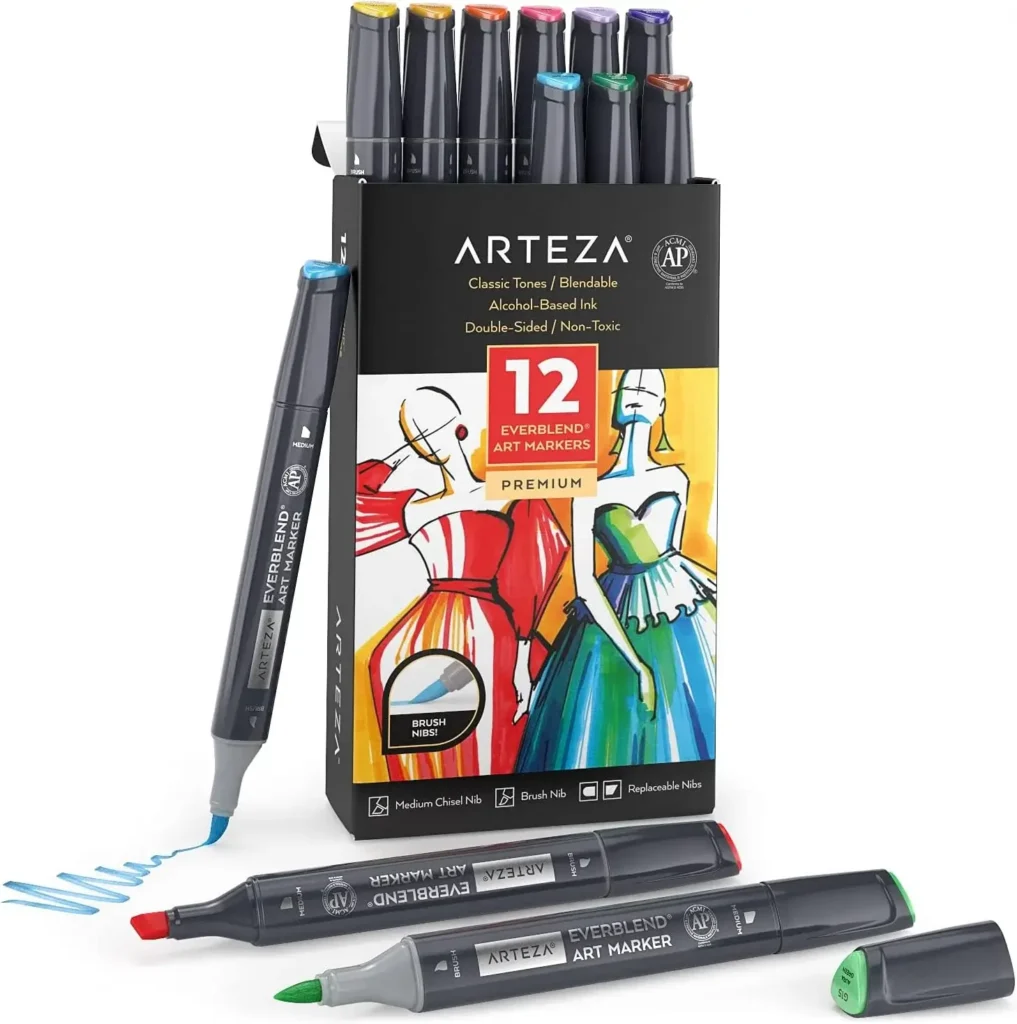
Arteza EverBlend markers are a solid middle option for hobby artists.
They are easier to control than many very cheap markers, and the colors blend well enough for coloring books, crafts, simple illustrations, and casual art practice. The barrel shape is comfortable, and the sets are not as overwhelming as some huge budget packs.
The brush tip is not at Copic level, but it holds up better than many low-cost felt-style markers. After regular use, you may notice softening, but it should still be fine for lighter work.
The main limit is long-term value. If the nib wears out or the marker dries, you do not get the same refill and repair system that makes pro markers last longer.
- Good blending for hobby use
- Comfortable to hold
- Easier to manage than huge color sets
- Better than many low-budget markers
- Smaller color range than major brands
- Brush tip may soften with heavy use
Best for: Hobby artists, coloring books, crafts, and people who want a step up from basic budget markers.
5. Spectrum Noir Illustrator Markers
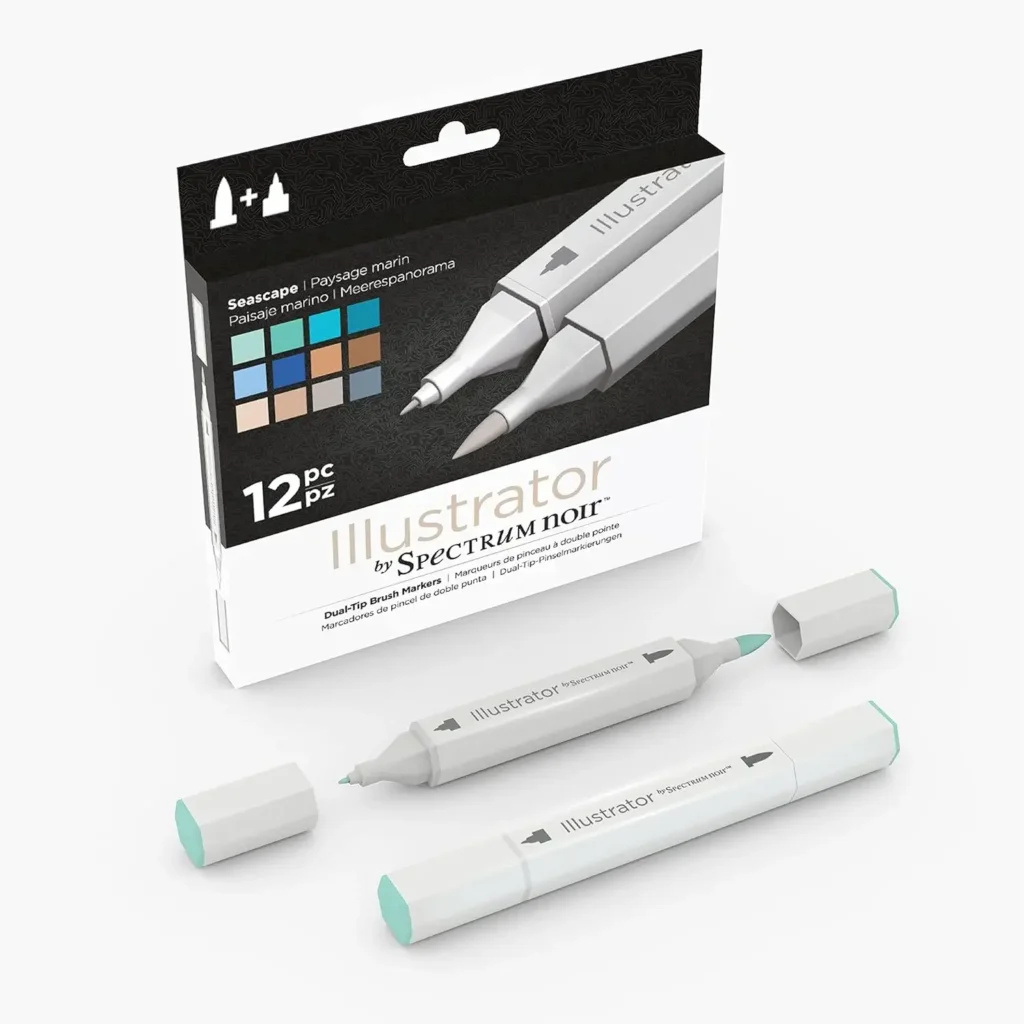
Spectrum Noir Illustrator markers are a good option for crafters and card makers who want more control than basic alcohol markers.
The fine tip is useful for small details, while the brush tip handles coloring and soft shading. The slim barrel is easy to hold, which helps during longer coloring sessions.
The ink can look softer than Copic or Ohuhu on some paper, especially on Bristol or more absorbent surfaces. The color range also feels more controlled and muted, which can be a good thing for crafts but less ideal if you want bright character art.
These markers make the most sense if your work is detailed, clean, and craft-focused. They are less exciting for artists who want a huge color system or bold blends.
- Fine tip and brush tip combo
- Comfortable slim barrel
- Good for detail work
- Nice for cardmaking and crafts
- Colors can look softer on some paper
- Not as wide a system as Copic
- Less bold than some budget marker sets
- Not the strongest pick for heavy illustration work
Best for: Cardmaking, crafts, coloring books, and controlled detail work.
6. Caliart Dual Tip Brush Markers
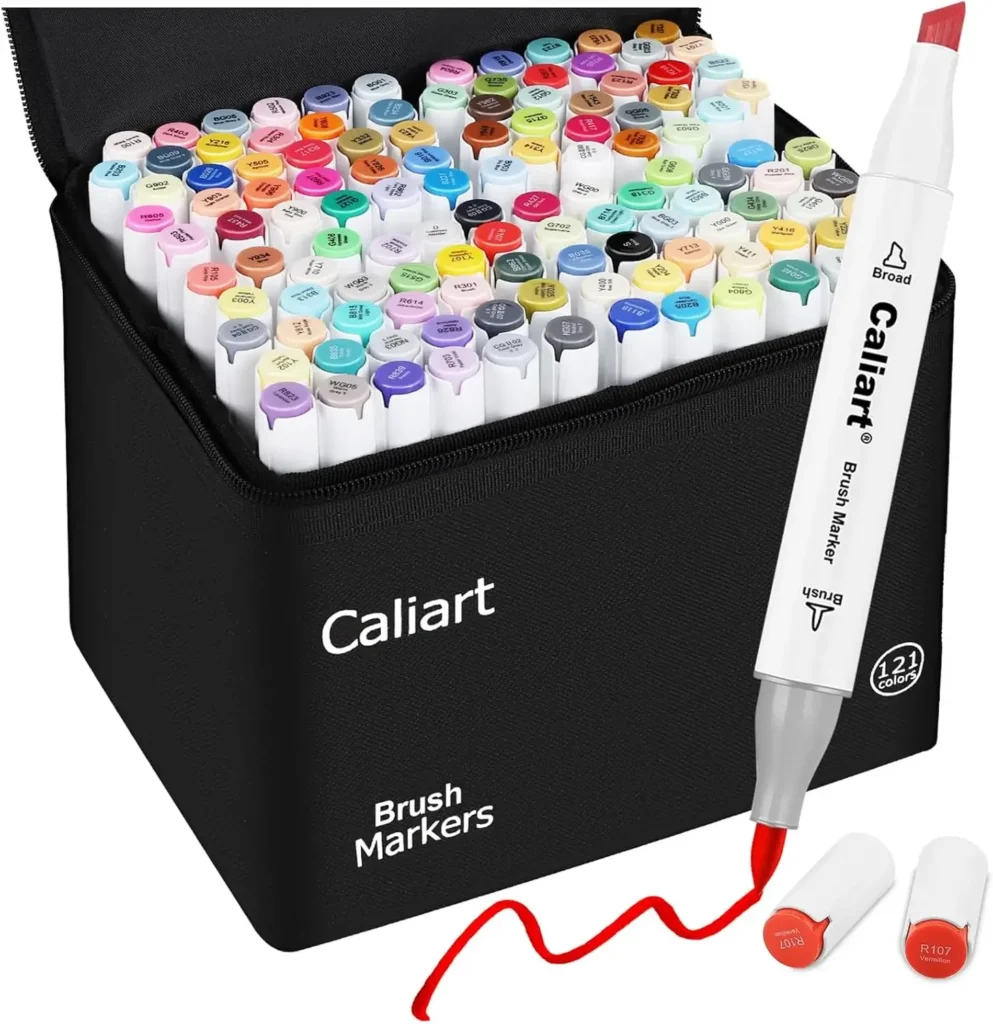
Caliart markers are low-cost options for people who want to try alcohol markers without spending much.
They usually give you large color counts for the price, which is useful when you are learning. You can practice blending, layering, and basic shading without worrying too much about wasting expensive ink.
The problem is tip quality. The brush tips can feel stiffer and less responsive than better brands. They may fray or lose shape faster, especially on rough paper or with heavy pressure. Color labels and cap colors may also need checking against a swatch chart.
These markers are fine for practice, but they are not the best long-term choice if you draw often. Read full Caliart alcohol markers review here.
- Very affordable
- Large sets available
- Good for basic practice
- Low-risk starting point
- Brush tips can feel stiff
- Tips may wear faster
- Cap colors can be unreliable
- Blending takes more effort
- Not ideal for serious daily use
Best for: Absolute beginners, casual coloring, practice sheets, and anyone testing alcohol markers for the first time.
7. TouchNew and TouchFive Brush Markers
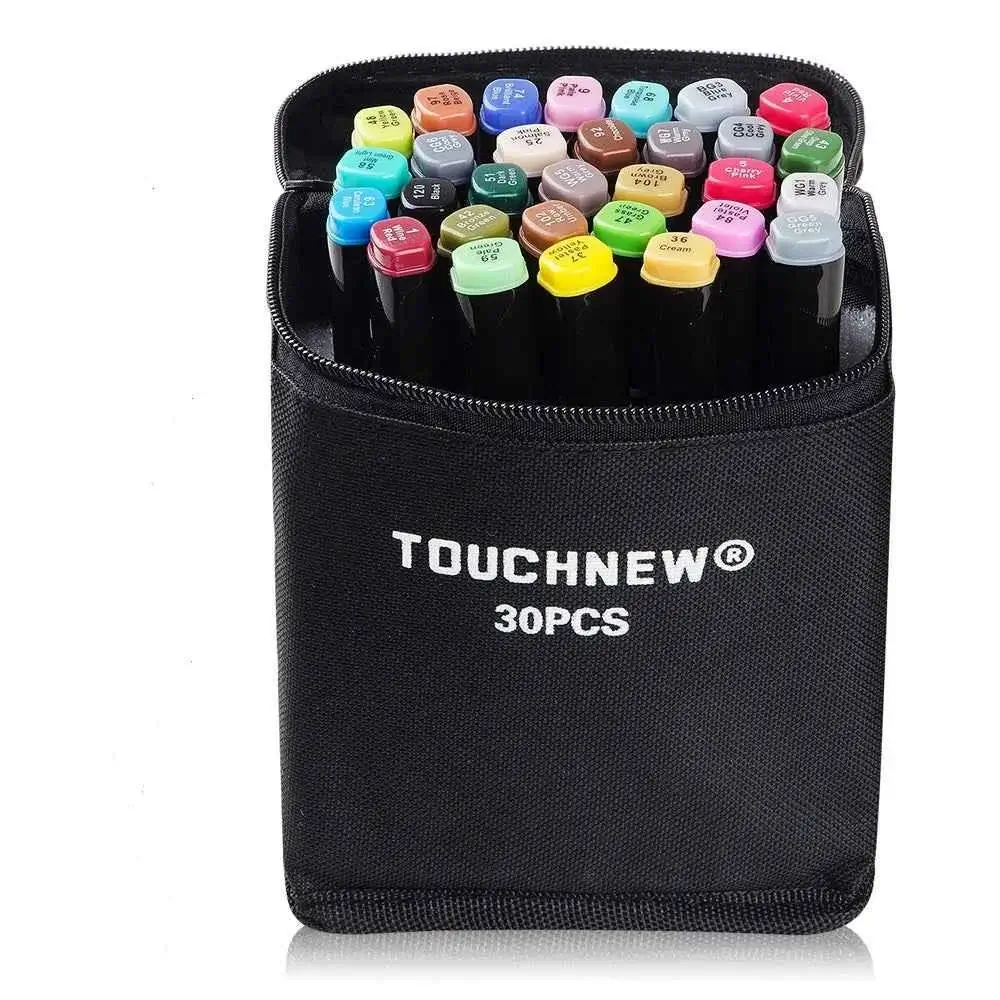
TouchNew and TouchFive markers are popular with students because the sets are usually affordable and the colors are bright.
They work best for flat coloring, anime-style practice, and simple character art. If you mainly fill shapes with clean blocks of color, the stiffer tip can actually feel easy to control.
The weaknesses show up when you need soft blends, smooth skin tones, or fine line variation. The ink can be inconsistent from marker to marker, and the alcohol smell may be stronger than some other brands. You should always make a swatch chart before using them on a finished piece.
These are practice markers, not long-term professional tools.
- Low upfront price
- Bright colors
- Good for anime-style flat coloring
- Easy for students to start with
- Stronger alcohol smell
- Inconsistent ink strength
- Limited brush control
- Tips can compress with regular use
- No strong long-term system
Best for: Students, anime practice, flat coloring, and early alcohol marker learning.
Quick Summary
- Copic Sketch is the best long-term choice if you draw often and want a marker system you can refill and repair.
- Ohuhu Honolulu is the best budget pick for most beginners because it gives strong color range and good brush performance for the price.
- Winsor & Newton works best for loose, rich color work, but it needs the right paper.
- Arteza EverBlend is a safe hobby option for coloring and crafts.
- Spectrum Noir Illustrator is best for cardmaking, crafts, and cleaner detail work.
- Shuttle Art, Caliart, TouchNew, and TouchFive are better for practice than serious daily use.
- If you are buying your first alcohol marker set, start with Ohuhu or Arteza. If you already know you will use markers often, Copic Sketch is the better long-term buy.
Budget-to-Premium Buying Guide
You have seen how each brand performs. Now the simple question is this:
How much should you spend?
The answer depends on how often you draw. A beginner does not need a full pro set. A daily illustrator should not keep replacing cheap markers every few months.
Under $1.00 Per Marker: The Learning Tier
It is where Ohuhu, Shuttle Art, Caliart, and TouchNew, usually sit when bought in larger sets.
The tier is best for beginners, students, coloring book users, and anyone still learning alcohol marker basics. You get enough colors to practice blending, shading, and layering without worrying about wasting expensive ink.
Ohuhu is the strongest pick in this range because the Honolulu brush tips feel better than most budget markers, and the brand offers large sets, including a 320-color Honolulu set. It also has separate skin tone and gray tone options, which helps if your main set has gaps.
The cheaper brands can still be useful, but the brush tips may feel stiff, fray faster, or lose control with heavy pressure. They are fine for practice, but not ideal for daily illustration work.
If you color a few pages a week, this tier works. If you draw for hours at a time, replacement costs can add up quickly.
$1.00 to $2.50 Per Marker: The Hobby Tier
This is the middle ground. Arteza EverBlend and Spectrum Noir Illustrator fit best here.
The tier is good for hobby artists, card makers, craft users, and people who want better control than the cheapest sets without jumping straight to Copic.
The nibs usually feel better, the barrels feel more comfortable, and the color sets are easier to use for real projects. You still need to check the exact product line before buying, because not every marker in this range has the same refill or nib support.
Spectrum Noir is useful for crafters because the Illustrator line has a brush and fine tip setup, and replacement nibs are available for the Illustrator range through marker retailers.
The tier makes sense if you draw or color often, but not every day. If you already know you want a long-term marker system, it may be smarter to save for Copic instead of buying too many middle-tier sets.
$3.50 to $8.00 Per Marker: The Professional Tier
This tier includes Copic Sketch and Winsor & Newton Promarker Brush.
Copic Sketch is the strongest long-term option because it has refillable ink, replaceable nibs, and a 358-color system. One Copic Ink bottle can refill an empty Sketch marker 7 times, which helps lower the long-term cost if you use the same colors often.
For example, if a Copic Sketch marker costs about $5.24 and a refill bottle costs about $4.58, the price feels high at first. But after the first refill, the cost per use drops. That is why refillable markers make more sense for serious artists than constantly replacing disposable ones.
Winsor & Newton Promarker Brush is different. It is strong for rich color and soft blended effects. The official Promarker Brush range includes 72 alcohol-based inks, so it is smaller than Copic, but still useful for illustration, design, and expressive work.
Choose this tier if you draw often, sell your art, make finished illustrations, or need consistent results. Skip it if you only use markers once in a while.
Curated Starter Palettes by Subject
Full sets are easy to buy, but they can waste money. A smaller palette built around your subject is usually smarter.
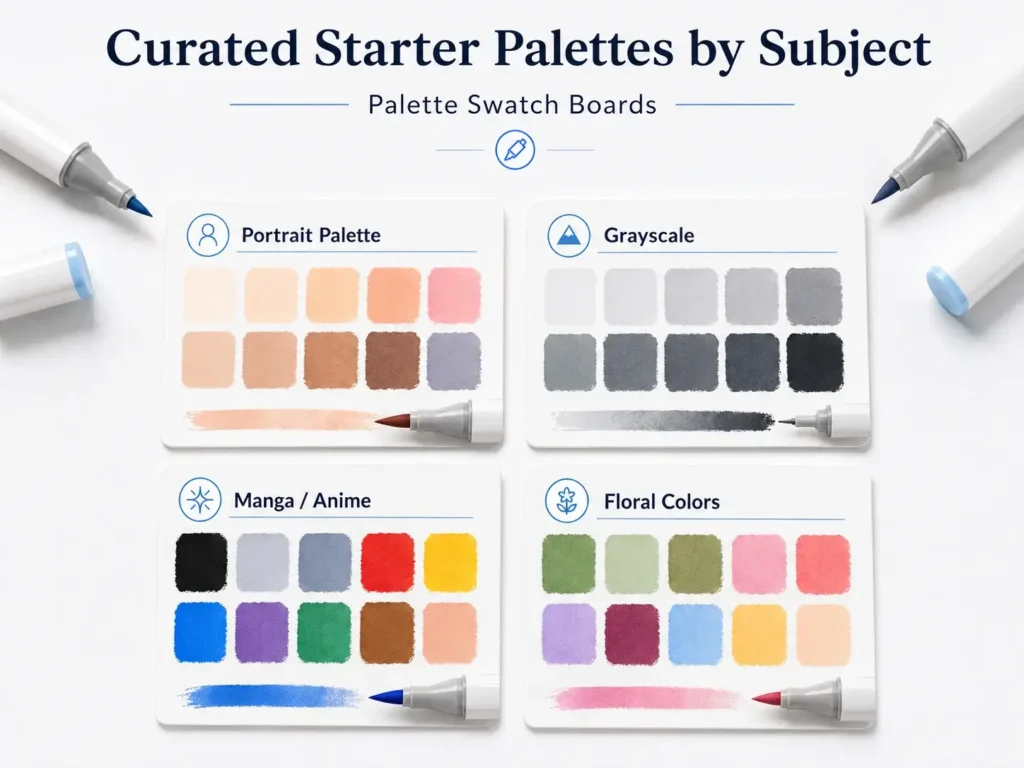
Portrait Essentials
For portraits, start with a skin tone set if you are on a budget. Ohuhu is good for practice, especially if you are learning cheek blends, shadows, and soft transitions.
Once you know your most-used colors, upgrade only those shades to Copic Sketch. A useful Copic portrait base could include E00 for pale skin, E11 for mid shadow, E21 for warm undertone, E29 for deep contour, R20 for blush, and R59 for lip depth.
Also add a cool gray trio such as C3, C5, and C7. These help with shadows without making skin look too orange or muddy.
Practice with budget markers, then replace only the colors you use the most.
Gray Scale Rendering
For monochrome work, the gray family you choose dictates if your piece reads as sterile or organic. Spectrum Noir’s IG series delivers industrial, steely grays perfect for tech or architectural sketches.
Copic’s N series is better for neutral gray work, while the C series gives a cooler, slightly bluish gray, preventing color casts in finely graded value studies. For budget warm grays, TouchNew’s markers are fine for concept sketching, though their lighter tones can shift slightly brown over time. Always test on your paper: a warm gray on a cold white sheet can look dirty
Manga and Anime Basics
For manga and anime work, you need strong contrast, clean flats, skin tones, hair colors, and useful shadow shades.
A practical Copic starter mix could include 120 Black, W1, W3, W5, R24, Y15, B29, V17, G07, YR07, E33, and E37.
You do not need every bright color at the start. Use budget markers for backgrounds and secondary areas. Save the better markers for faces, hair, shadows, and focal details.
Floral and Botanical Art
Winsor & Newton’s high-saturation markers (G156, G166, Y337, R379, V741, B723) deliver the vivid blooms that photos can’t capture. They layer cleanly, but their intensity can overpower. For softer, naturalistic transitions, start with Arteza Everblend’s muted tints.
They’re forgiving and cheap enough to practice wet-on-wet layering. Once you’re confident, upgrade to the W&N for the final punch. The combination mimics the way light hits petals: a soft base with a saturated edge.
Of course, even the best palette falls apart on the wrong paper. Let’s fix that
Paper and Surface Recommendations
Paper can make a good marker look bad.
Alcohol ink behaves differently on each surface. Smooth marker paper gives more time to blend. Bristol smooth is good for clean line work. Vellum has more tooth, so it can drag on brush tips. Cardstock is cheap, but it can drink up ink fast.
| Paper Surface | Bleed Control | Blend Feel | Best Match | Estimated Cost Per Sheet |
|---|---|---|---|---|
| Copic XL Marker Paper | Excellent | Very smooth | Copic, Ohuhu, Winsor & Newton | About $0.50 |
| Bristol Smooth | Good | Smooth, but needs a quicker hand | Copic, Ohuhu, Spectrum Noir | About $0.35 |
| Bristol Vellum | Fair | More drag, more texture | Winsor & Newton, Copic | About $0.35 |
| Hammermill Premium Cardstock | Poor | Can look patchy or muddy | Practice work only | About $0.12 |
No paper is perfect for every marker. Copic XL gives the cleanest marker result. Bristol smooth is a good middle option if you ink and color on the same sheet. Bristol vellum works if you like texture, but it can wear tips faster. Hammermill cardstock is cheap and fine for practice, but it is not the best choice for finished marker art.
Why Paper Weight Matters Less Than Surface
A thick sheet is not always marker-friendly.
Hammermill Premium Cardstock may be 110 lb, but it is still absorbent. Alcohol ink can sink in quickly, spread past the line, and bleed through. A smoother marker paper controls the ink better because the surface slows absorption.
That is why coating and surface finish matter more than weight alone.
Before judging a marker, test it on the exact paper you plan to use. If the blend looks muddy, the issue may be the paper, not the marker.
Understand Brush Tip: Why Some Nibs Feel Mushy
A good brush tip bends under pressure and returns to a clean point when you lift. That return is what gives you smooth thin-to-thick strokes.
A weak brush tip does not recover as well. It may stay soft, split, or turn blunt after repeated pressure. Once that happens, you press harder, waste more ink, and lose clean control.
Copic’s Super Brush is one reason many artists still pay more for Sketch markers. It is made for flexible line work, and the nib can be replaced when it wears out.
Budget markers can still work, but their tips usually do not hold the same shape under heavy daily use. It does not make them useless. That just means they are better for practice, coloring, and casual art than for long sessions where line control matters.
The Spring Tip Myth
Some brands use words that make the brush tip sound like it has a hidden spring. In most alcohol markers, the bounce comes from the material of the nib, not a small metal spring inside the marker.
What you feel as snap-back is the tip bending and returning to shape. If the tip is dense and well-made, it feels crisp. If it is too soft or poorly built, it feels mushy.
The best way to judge a brush tip is to make a thin line, press into a thicker line, then lift. If the tip returns to a point, it is a good sign. If it stays flat or split, it will probably frustrate you over time.
Simple Buying Advice
- If you are learning, start under $1.00 per marker with Ohuhu or another budget set.
- If you are a hobby artist, the $1.00 to $2.50 range is usually enough.
- If you draw often, sell work, or need markers that last, move into the $3.50 to $8.00 range and build a Copic Sketch set slowly.
- Do not buy the biggest set first. Buy the colors you will actually use, test them on your paper, and upgrade the shades you reach for most.
Expert Technique Tips for Daily Use
Good markers help, but technique still matters. These small habits can make your blends cleaner and your markers last longer.
Start Light, Then Build Dark
Always start with the lightest color in your blend. Lay down a light base, then add midtones and shadows while the ink is still workable.
It helps keep the paper from getting too wet too quickly. It also gives you more control over the final shade.
If you start too dark, it is harder to fix. Alcohol markers can soften color, but they do not erase like a pencil.
Use the Blender to Move Color, Not Erase It
The colorless blender is often misunderstood. It is not a magic eraser.
Use it to soften a hard edge, push color outward, lighten a small area, or prepare the paper before adding color. If you scrub with it, you can damage the paper and make the blend look rough.
Prime the Paper Before Heavy Blending
For smoother blends, lay down a thin base layer first. It can be your lightest color or, in some cases, a colorless blender layer.
That first layer helps the next colors move more smoothly. It also reduces drag, which is easier on the brush tip.
It works best on marker-friendly paper. On absorbent cardstock, the paper may still drink the ink too fast.
Clean the Blender Tip Often
A blender tip picks up color quickly. If the tip looks tinted, scribble on scrap paper until it runs clear.
It takes a few seconds, but it keeps the next blend cleaner. If you skip this step, you may drag old pigment into a new area and make the color look dirty.
Replace Frayed Nibs Early
A frayed nib is not just ugly. It affects the whole stroke.
Once the tip splits or stops returning to a point, you press harder without noticing. That can waste ink, rough up the paper, and make your lines uneven.
If the marker has replaceable nibs, swap the nib early. It is better than fighting a worn tip through a finished piece.
FAQs
What paper is best for alcohol markers?
Smooth marker paper is usually the best choice for alcohol markers because it helps the ink blend better and reduces tip drag. The paper should be smooth, bleed-resistant, and made for marker or illustration work.
Copic marker paper, smooth Bristol paper, and good-quality marker pads are strong options. Cardstock can work for practice, but it often absorbs more ink, which can make blends look patchy and use up markers faster.
The simple rule is do not judge a marker until you test it on the paper you plan to use. The same marker can look smooth on marker paper and messy on absorbent cardstock.
What are the best brands of alcohol markers?
The best alcohol marker brand depends on your budget and how often you draw.
Copic Sketch is the best choice for serious artists because it has refillable ink, replaceable nibs, and a large 358-color system. Ohuhu Honolulu is the best budget pick for beginners and hobby artists because it gives strong color range and good brush performance for the price.
Winsor & Newton Promarker Brush is good for rich color and loose illustration work. Arteza EverBlend works well for hobby art, coloring books, and crafts. Spectrum Noir Illustrator is a solid choice for cardmaking and controlled detail work.
If you are just starting, choose Ohuhu or Arteza. If you draw often and want a long-term marker system, Copic Sketch is the stronger choice.
What are alcohol markers best used for?
Alcohol markers are best used for smooth coloring, blending, shading, and illustration. They are popular for portraits, manga, anime art, comics, fashion sketches, product sketches, cardmaking, and coloring books.
They work especially well when you want clean color layers, soft gradients, and strong coverage. Because the ink dries fast, they are also useful for quick sketching and finished artwork.
They are not the best choice for thin regular paper because they can bleed through. For best results, use marker paper or smooth illustration paper.
What is the best way to store alcohol markers?
The best way to store alcohol markers is horizontally, with the caps closed tightly. This helps keep ink more evenly balanced between both tips.
Keep them in a cool, dry place away from direct sunlight. Heat and sunlight can affect the marker body, caps, and ink quality over time.
Also, always check that the cap clicks shut after use. A loose cap can dry out the marker faster than bad storage position.
Summing Up
The best alcohol marker is not the one with the biggest set, the flashiest case, or the highest price.
It is the one that fits how you actually work.
If you are learning, a budget set makes sense. If you are a hobby artist, a middle-tier marker can give you better control without a huge spend. If you draw often, refillable markers with replaceable nibs are usually the smarter long-term choice.
Paper matters just as much. A good marker can still bleed, drag, or look patchy on the wrong surface. Test every marker on the paper you plan to use before buying a full set.
The simple rule is this: match the marker to your drawing style, your paper, and your use level.
Do that, and you will waste less money, keep cleaner blends, and build a marker set that actually works for you.
Disclosure: This post contains affiliate links. As an Amazon Associate, I earn from qualifying purchases. It means that if you click on an Amazon link on this site and make a purchase, I may earn a small commission at no extra cost to you. Thank you for your support!